Running numerical simulations prepared by experts can be highly challenging; often, the only person truly equipped to run certain simulations accurately is the original creator of the model. As a result, simulation experts find themselves tethered to their own scripts, making it difficult to transfer their work to other teams in a user-friendly, self-contained package. In many cases, this slows down the progress of simulation-centric projects, as multiple teams, often with little or no expertise in the scientific domain or the associated simulation technologies (e.g., machine learning teams), need to interact with complex simulation models.
Such a challenge was one of the key reasons we decided to build an API-first simulation platform. The Inductiva API has a number of features that enable domain experts to encapsulate their knowledge, and all complexities of their simulations, into a simple Python package that others can easily use and build upon—without needing to understand the intricacies of the simulation itself.
Transform an OpenFOAM Simulation into a Python Package
We recently demonstrated this capability using the Inductiva API to create a Python package that emulates wind flow around various objects using OpenFOAM, one of the most popular open-source Computational Fluid Dynamics (CFD) simulators. The resulting “WindTunnel” Python package allows other engineers to, using just a few lines of Python code, run multiple wind tunnel simulations and obtain aerodynamic properties for various input objects at different wind speeds, without requiring in-depth CFD knowledge, setting up HPC resources, or even having a local OpenFOAM installation.
Pretty neat, right? Let’s break down how!
The Recipe
- Organize your Input Files
First, as a domain expert looking to share your simulation model with other engineers, you need to prepare the configuration files for a “base case”. For our example, we gathered all required input files for OpenFOAM´s wind tunnel, inspired by OpenFOAM motorbike tutorial, and we placed them in a directory called “templates.” - Make Relevant Parameters Configurable
Then, you need to “generalize” certain parameters of interest by using our templating mechanism to replace the numeric or categorical values in your original configuration file with variable placeholders. These simulation parameters will later be the ones that users can tweak via Python coding. In our example, we generalized two key aspects: first, the wind speed variable, and second, the 3D mesh of the object placed inside the wind tunnel simulation. Additionally, parameters such as the wheelbase length and the projection area of the object were also made configurable. However, these values will be automatically calculated based on the input 3D mesh.

Detail view of the system/forceCoeffs configuration file. - Define your Python Interface
Next, you would want to create a Python class to represent your simulation environment. This step includes methods to set up the simulation, insert necessary components, and define simulation hyperparameters like resolution, centering, or rotation that could impact your simulation´s accuracy. To achieve this, we opted for implementing a simple ”WindTunnel” class that allows users to define a 3D object mesh, and then start simulations with configurable parameters (like wind speed) and hyperparameters (like the maximum iteration count for the simulation).
Running the Wind Tunnel App with Python
Now, let’s take a look at how easy it is to use the final WindTunnel python package, which should encapsulate all the complexities of CFD simulation. To try this out, let’s suppose we want to run WindTunnel simulations for five different vehicles at three different wind speeds each.
First, we begin by instantiating a WindTunnel class, providing the dimensions of the wind tunnel (in meters) to ensure it’s big enough to house the different vehicles we’ll place inside. Then, with two simple FOR loops, we place the objects inside the WindTunnel and iterate through different wind speeds for each one. For every combination of object and wind speed, we submit a new simulation that runs in parallel.
import windtunnel

wind_tunnel = windtunnel.WindTunnel(dimensions=(20, 10, 8))

for vehicle in ["truck", "excavator", "car", "tractor", "race_car"]:
    wind_tunnel.set_object(object_path=f"assets/{vehicle}.obj")

    for wind_speed_ms in [10, 30, 50]:
        task = wind_tunnel.simulate(
            wind_speed_ms,
            num_iterations=300,
            resolution=5
        )
Under the hood, the WindTunnel class takes care of parameterizing the corresponding OpenFOAM simulations, issues requests to the Inductiva backend to start the simulations, and then fetches the results for us once they are complete. This spares users the need to directly configure the underlying OpenFOAM simulation or handle the potentially complex setup of cloud machines.
Additional Features
Additionally, these python packages can be extended with additional features that go beyond just running simulations. Both pre-processing and post-processing steps can also be included in the Python packages. In our case, we chose to include two additional classes specifically for post-processing and visualizing the results of the simulation.
Next, we download the outputs and pass them to the WindTunnelOutputs class. This class makes it easy to retrieve simulation results such as force coefficients, streamlines, and pressure maps.
output_dir = task.download_outputs()

windtunnel_outputs = windtunnel.WindTunnelOutputs(output_dir)

force_coefficients = windtunnel_outputs.get_force_coefficients()

pressure_field_mesh = windtunnel_outputs.get_interpolated_pressure_field()

streamlines_mesh = windtunnel_outputs.get_streamlines()
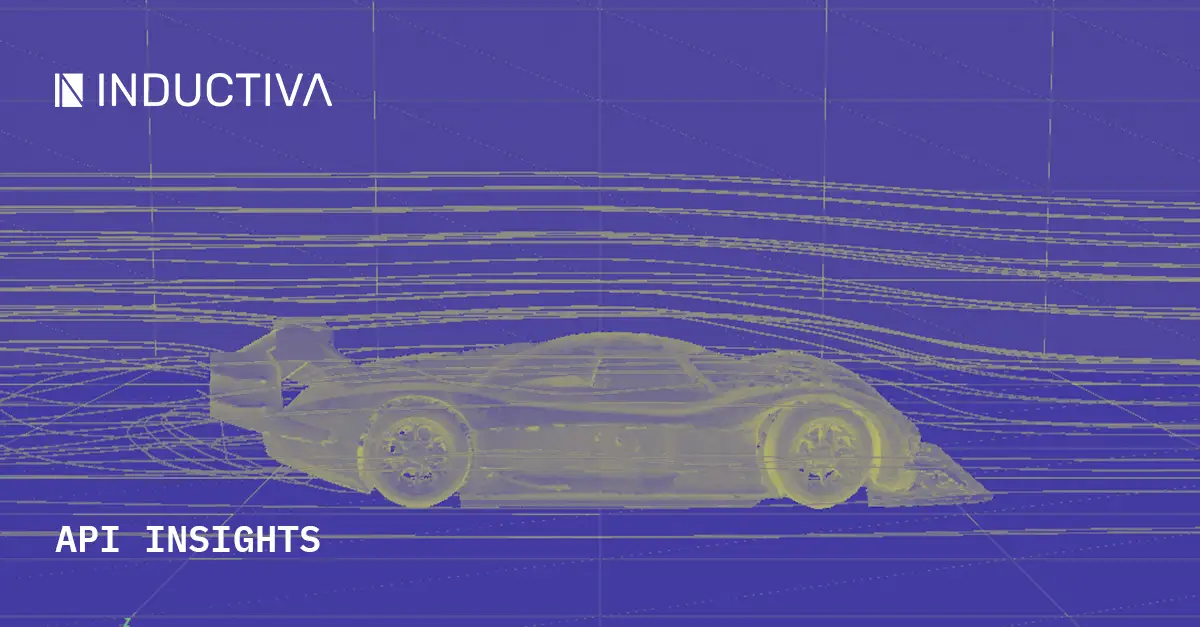
Then, we use the WindTunnelVisualizer class to visualize the outputs in our virtual wind tunnel. For this, we only need to set the dimensions of the windtunnel visualizer and add the outputs we want to visualize. Finally, the result is a 3D interactive visualization, as shown in the figure below.
visualizer = windtunnel.WindTunnelVisualizer(
    dimensions=(20, 10, 8)
)

visualizer.add_force_coefficients(force_coefficients)

visualizer.add_mesh(
    pressure_field_mesh,
    color='red',
    scalars='p'
)

visualizer.add_mesh(
    streamlines_mesh,
    color='blue',
    opacity=0.5
)

visualizer.show()

We use PyVista for the visualization, a tool often reserved for domain experts. However, our simple Python package shields engineers who may not be familiar with such visualization packages from their complexities.
A Turning Point for Simulation Experts
This example is only the beginning of how far you can go with Inductiva´s API. By following the same recipe we used above, simulation experts could use the API to generalize their cases across different domains, create different Python packages, and make them accessible to non-expert users, such as ML engineers and other software engineers.
Try out the Inductiva API and experience its powerful capabilities for yourself, no matter how complex your simulations are. You can also explore the range of hardware options available for running your simulations via Inductiva, and how our Templating Engine allows you to generalize your base cases and run hundreds of variations of your simulations with ease.
Get in touch with us for a demo!