Run your simulations only when you need to. No licenses, no subscription traps.
TurbSim Visualization
In the Generate a TurbSim Dataset tutorial, we used the 5MW_Baseline wind example,
which is based on the reference case described in "Definition of a 5-MW Reference Wind Turbine for Offshore
System Development".
In this tutorial, we’ll walk you through how to visualize the simulation output.
Requirements
To follow this tutorial smoothly, please ensure you have the following tools and libraries installed.
Install Openfast_toolbox
This library is used to load TurbSim output files via the TurbSimFile class.
git clone http://github.com/OpenFAST/openfast_toolbox
cd openfast_toolbox
python -m pip install -e .
Install numpy and matplotlib
These libraries are essential for data processing and creating animations.
pip install numpy
pip install matplotlib
Install FFMPEG (optional)
Required by matplotlib to generate .mp4 video files.
sudo apt install ffmpeg  # on Linux
brew install ffmpeg      # on Mac
Python Visualization
We'll walk through a Python script that visualizes wind speed data from a .bts file generated by TurbSim. Step by step, we’ll explain each part of the code, and at the end you’ll find the complete script ready for you to run or customize.
Step 1: Import Required Libraries
Import necessary Python libraries:
numpyfor numerical operationsmatplotlibfor plotting and animationTurbSimFilefromopenfast_toolboxto load TurbSim output files
import numpy as np
import matplotlib.pyplot as plt
from matplotlib.animation import FuncAnimation
from openfast_toolbox.io import TurbSimFile
Step 2: Load the TurbSim File
Load the .bts file using TurbSimFile. This file contains 3D wind field data over space and time.
ts = TurbSimFile("<your_bts_file>")
print(ts)
Step 3: Extract and Transform Wind Speed Data
The 'u' component represents the longitudinal wind speed (x-direction).
We extract this and transpose it so we can animate it over time. The final array shape becomes time, z, y.
speeds = ts['u']  # Shape: [z, y, t]
print("speeds shape:", speeds.shape)

speed_x = np.transpose(speeds[0], axes=(0, 2, 1))  # [t, z, y]
print("speed_x shape:", speed_x.shape)
Step 4: Prepare Color Scaling
Determine the global minimum and maximum values for the color scale. This ensures the color map stays consistent across all frames in the animation.
vmin = np.min(speed_x)
vmax = np.max(speed_x)
Step 5: Retrieve Spatial and Time Axes
Extract the height (z), width (y), and time (t) values for labeling and plotting.
z_vals = ts['z']  # Height levels
y_vals = ts['y']  # Horizontal (width)
t_vals = ts['t']  # Time
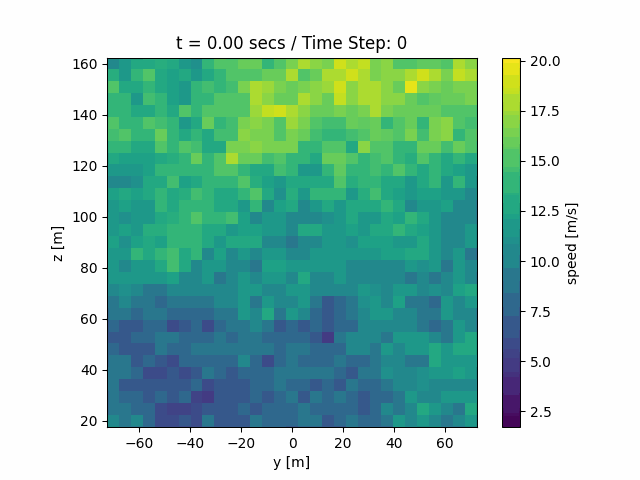
Step 6: Set Up the Plot
Configure the initial heatmap using imshow. The extent parameter ensures proper axis labeling, and origin='lower' makes the plot follow Cartesian coordinates. Label the axes and add a colorbar to indicate wind speed values.
fig, ax = plt.subplots()
extent = [y_vals[0], y_vals[-1], z_vals[0], z_vals[-1]]

heatmap = ax.imshow(speed_x[0],
                    cmap='viridis',
                    extent=extent,
                    origin='lower',
                    animated=True,
                    vmin=vmin,
                    vmax=vmax)

cbar = plt.colorbar(heatmap, ax=ax)
cbar.set_label("Wind Speed [m/s]")

ax.set_xlabel("Y [m]")
ax.set_ylabel("Z [m]")
ax.set_title("Ux [m/s]")
Step 7: Define the Animation Function
This function updates the heatmap for each time frame and displays the current time in the title.
def update(frame):
    heatmap.set_array(speed_x[frame])
    ax.set_title(f"t = {t_vals[frame]:.2f} s / Frame: {frame}")
    return [heatmap]
Step 8: Generate and Save the Animation
Use FuncAnimation from matplotlib to create the animation. The animation is saved in both .gif and .mp4 formats for flexibility.
Note: Saving as
.mp4requires FFMPEG to be installed.
anim = FuncAnimation(fig,
                     update,
                     frames=speed_x.shape[0],
                     interval=50,
                     blit=True)

anim.save("heatmap_animation.gif", writer="pillow", fps=30)
anim.save("heatmap_animation.mp4", fps=30, dpi=150)

plt.close()
Code Overview
Below is the complete code needed to visualize the simulation output.
import numpy as np
import matplotlib.pyplot as plt
from matplotlib.animation import FuncAnimation
from openfast_toolbox.io import TurbSimFile

# Load .bts file
ts = TurbSimFile("<your_bts_file>")
print(ts)

# Extract longitudinal wind speed and reshape for animation
speeds = ts['u']
print("speeds shape:", speeds.shape)
speed_x = np.transpose(speeds[0], axes=(0, 2, 1))
print("speed_x shape:", speed_x.shape)

# Set up color limits
vmin = np.min(speed_x)
vmax = np.max(speed_x)

# Get coordinates
z_vals = ts['z']
y_vals = ts['y']
t_vals = ts['t']

# Set up figure and heatmap
fig, ax = plt.subplots()
extent = [y_vals[0], y_vals[-1], z_vals[0], z_vals[-1]]
heatmap = ax.imshow(speed_x[0],
                    cmap='viridis',
                    extent=extent,
                    origin='lower',
                    animated=True,
                    vmin=vmin,
                    vmax=vmax)

# Add colorbar and labels
cbar = plt.colorbar(heatmap, ax=ax)
cbar.set_label("Wind Speed [m/s]")
ax.set_xlabel("Y [m]")
ax.set_ylabel("Z [m]")
ax.set_title("Ux [m/s]")

# Update function for animation
def update(frame):
    heatmap.set_array(speed_x[frame])
    ax.set_title(f"t = {t_vals[frame]:.2f} s / Frame: {frame}")
    return [heatmap]

# Create and save animation
anim = FuncAnimation(fig, update, frames=speed_x.shape[0], interval=50, blit=True)
anim.save("heatmap_animation.gif", writer="pillow", fps=30)
anim.save("heatmap_animation.mp4", fps=30, dpi=150)

plt.close()
Copy and customize it to create your own output animations.